
Kane County’s Best of the Fox
On May 7th Hobson Plumbing and Heating was voted one of Kane County’s Best of the Fox Plumbers for 2021, as voted on by the Kane County Chronicle readers. We are extremely grateful for those who nominated or voted for us, being recognized truly is an honor.
On behalf of Hobson Plumbing and Heating Management, we would also like to take this time to thank our team. Without their hard work and dedication to ensuring our customers are always taken care of, this could never be possible. Thank you.
Hobson Plumbing and Heating was created with a desire to run a family-owned company and to implement honesty and integrity as the benchmark for others to look up to in the plumbing and heating industry. We hope to continue serving the North Aurora, Fox Valley, and surrounding communities for many years to come.
3 Tips for a Cool Home This Summer
As the temps begin to rise in Chicagoland, don’t be caught sweating it out inside your home! The last thing you want on the first super hot day of summer is to find your air conditioning unit doesn’t work. This could be the case if you don’t do a bit of simple annual maintenance before summer gets here. Spring is the perfect time in Chicago to get your air conditioner ready for summer.
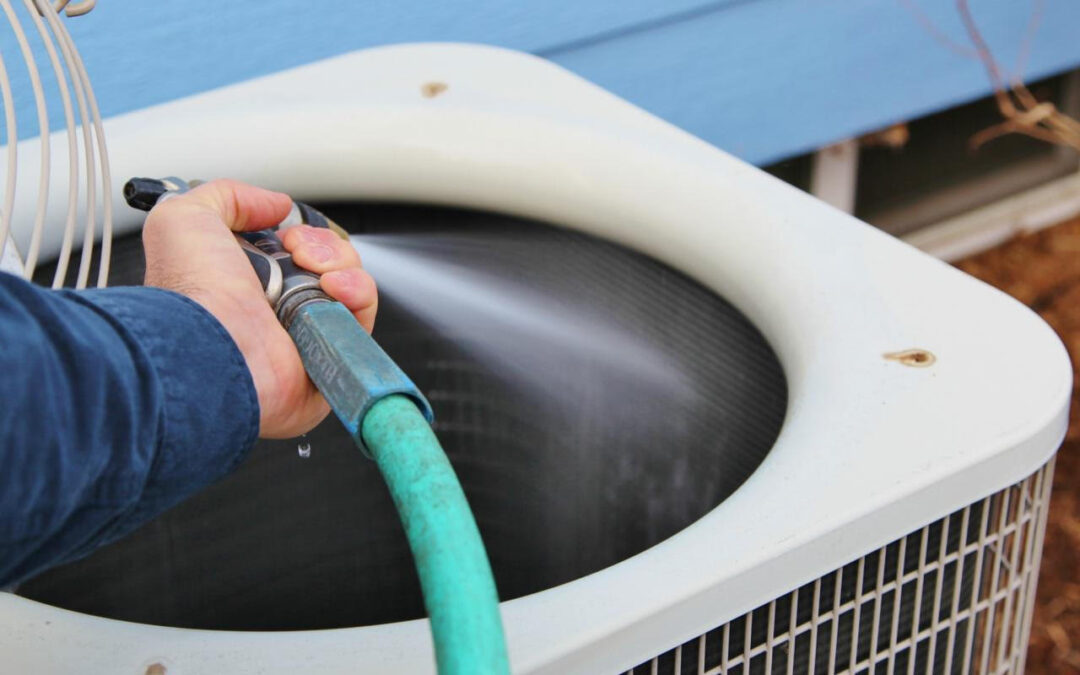
A central air conditioner has an indoor air handler and an outdoor compressor. The condenser unit is usually located outside your home. This is the part of your air conditioning unit that you will want to clean and rid of debris that may have built up over the fall and winter months. Replacing the air filters, cleaning the condenser, and performing a few minor checks will get your AC unit into tip-top shape so it’s ready to cool you and your loved ones efficiently this summer.
Safety First
Turn off the circuit breaker before you begin maintenance on your air conditioning system. Turning off the power to the condenser at the service panel is also essential before working on your air conditioner unit. The condenser typically has a 240-volt weatherproof disconnect box located near the unit. This contains a lever, fuses, or a circuit breaker to shut off the condenser. Be sure to turn this off as well.
How to get your air conditioner ready for summer in 3 simple steps:
1. Clean or Replace the Filters
Clean or replace your furnace or air-handler filters whenever they begin to look clogged or filled with dust. This should be done at least twice a year. Not changing these filters will restrict air flow and reduce the efficiency of your air conditioning unit. Dust filters also recirculate dust into your home.
2. Clean the Air Conditioner’s Condenser Coils
Another step to AC maintenance is to clean your air conditioning unit’s condenser coils and fan of debris. A central air conditioner’s condenser unit is typically located outdoors. It is a large fan in a metal box with sides. If your condenser unit was covered during the winter, uncover it. In this case, there’s likely not much debris to clear away. If it wasn’t covered, you’ll likely need to clear away more yard debris and dirt. Make sure the fan is free and clear of all debris. Air moves across radiator-style condenser coils inside the box. Check to see if debris has clogged the coils. If so, these coils need to be cleaned so your condenser unit is most efficient when running.
To clean the coils:
• Remove the side and top panels or protective grilles from the condenser unit.
• Lift off the top. The fan may be attached to it making it heavy. Note: Don’t tug any of the wires connected to the fan.
• Using a refrigerator coil brush or a soft brush on a vacuum, gently clean the coils from the outside of the unit. After you clean the outside, vacuum coils from the inside. Note: Be careful not to bend the delicate fins or damage the coils.
3. Clean and Clear Debris
Clear all leaves and debris out of the base of the condenser. If your air conditioning unit has a drain, make sure the drain is clear. Clean the blower’s fan blades using a vacuum or a rag. Clean up any excess water inside the unit. Once everything is cleared and cleaned, reassemble the condenser.
Hobson Plumbing and Heating is always here for your air conditioning maintenance needs. If the job is too overwhelming or you can’t find the time contact us today at 630.761.3400 to schedule an appointment.
4 Reasons Why AC Won’t Turn On
Summertime in the Chicagoland area is almost here and when air conditioning becomes really important, especially if you are working remotely at home. The first time you turn on your unit is always nerve-wracking given that it’s likely been close to a year since you last used it. If after troubleshooting with these 3 tips and you can’t solve the problem, contact Hobson Plumbing and Heating for assistance. Once you’ve figured out why your AC unit won’t turn on, fixing it can often be surprisingly easy.
Trip the circuit breaker
Your central electrical panel splits electricity from your main line out to every electrical fixture in your home. This often will include your thermostat (if it’s connected instead of battery-operated) and your AC unit. Circuit breakers trip to protect your fixtures when there’s a surge of electricity. Tripped circuit breakers turn all the electricity off to the fixture they’re protecting until it’s been reset.
Tripped circuit breakers are pretty common. You may only notice that a circuit breaker tripped when you notice the fixture won’t turn on. Locate your main electrical service panel and look for tripped breakers. The tripped breaker will be shifted down to the “OFF” position rather than the “ON” position, and may also be indicated by a red warning label. Simply flip the circuit breaker back on and check to see if your AC unit kicks back on.
Test the thermostat
If your thermostat isn’t working properly, then it may not send the correct cooling instructions to your AC unit. Even if the AC unit is working fine, it will never turn on because it doesn’t know that it’s being told to do so. Thermostats are usually easy to spot when they malfunction. If the display won’t turn on, it doesn’t respond to what you’re suggesting it does, or immediately loses programming, these all point to signs that something’s wrong. Try also checking the batteries to see if they need to be replaced or, again, tripping a circuit breaker.
If nothing seems wrong with your thermostat, there is one relatively simple way to test it if you’re comfortable taking this next step. First, turn off the power to your thermostat (IMPORTANT FOR YOUR SAFETY). Take down your thermostat and open up the access point in the back with a screwdriver. Find the red and green wires, unscrew them, and manually wrap them together. Then, let go of the wiring and flip the breaker back on. If the AC unit starts, then you need to replace the thermostat.
Clear the Drain Line
While you have the access panel open to your AC unit, find the condensation pump. This pump removes moisture that tends to build up on the unit’s condensation tray by pumping it through the drain line. This drain line deposits the condensation outside of the unit as intended. If the drain line becomes clogged though then the pump won’t be able to remove condensation. Instead, it will build up inside the AC unit until the unit’s safety features stop working properly.
Unclogging the drain pump or cleaning your AC Unit’s condensate line is fairly easy. First, always remember to turn off the power that leads to the AC unit. Locate the tray, pump, and drain line. If you have a hand vac, suction out any excess moisture in the tray. Then, disconnect the drain line and use the hand vac to suction and remove any clogs inside that may exist. If you don’t have a hand vac, use water or an air compressor. After reassembling the components, add a little moisture back to the tray to make sure everything is working properly.
If you’ve tried each of these common troubleshooting tips and you still can’t get your AC unit to turn on, please don’t panic! These steps haven’t exhausted all the possible issues, just the ones you should try yourself. You can always call Hobson Plumbing and Heating at 630.761.3400 and we will be happy to assist.
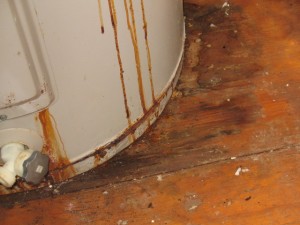
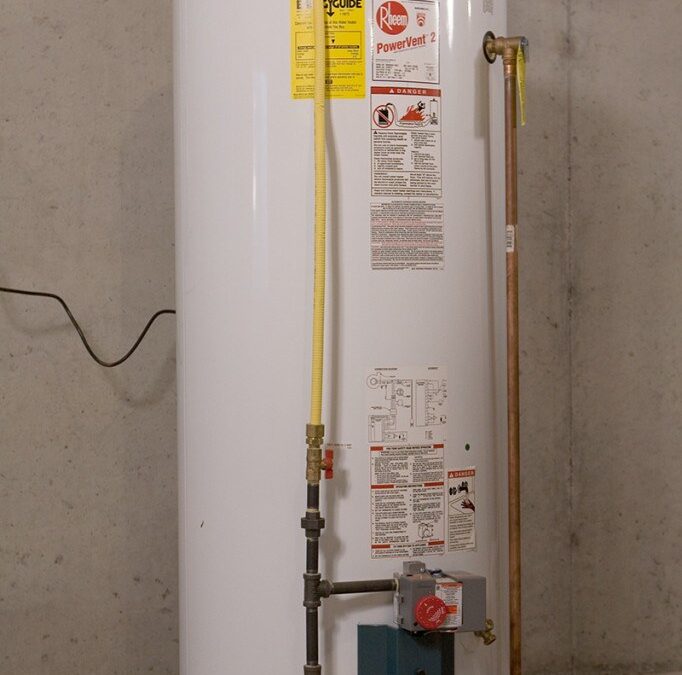
Rust on a Water Heater
Rust can take root in different places on your water heater and might be the result of ill-fitted connections. However, rust on the bottom of your water heater’s tank is a bigger issue. We would advise contacting Hobson Heating and Plumbing, a trusted service provider in the Chicagoland area, to find out if the tank’s interior liner has corroded. This appears after the anode rod fails. When functioning as usual, the anode rod filters impurities from the water.
When your tank has corroded, it’s smart to schedule a service appointment. At Hobson Plumbing and Heating we help you with your water heater frustrations such as how best to handle rust, no hot water, not enough hot water, temperature fluctuations, diagnostic issues, and sizing.Otherwise, you risk having your home flooded with gallons of water when the tank fails.
Here are a few other signs that your water heater is beginning to fail.
4 Hints That You Need A Water Heater Replacement
While your water heater can’t inform you exactly when it’s going to shut down, these are signs that it’s likely about to happen.
1. Age of Water Heater
A quality water heater typically lasts for about 10 years. If your unit is approaching this age or is even older, it’s a good idea to consider replacing it even if it’s still running. While many homeowners think waiting is ideal for their wallets, you run the risk of encountering further damage if the tank does end up leaking.
2. Rusty Water
This is evidence that your water heater’s tank is rusting. Your water could taste unpleasant or even stain your clothes when you wash them. While rust isn’t always harmful, it affects your water quality and may also damage your bathroom fixtures by leaving stains.
3. Less Hot Water
Your water heater should provide a steady supply of hot water, even if you’re showering and washing clothes at the same time. If you discover yours is struggling even with minimal use, it’s time to get a replacement. Read more about this on one of our recent blogs 8 Steps to Prevent Running Out of Hot Water.
4. Abnormal Sounds
When your water heater’s anode rod stops working, sediment builds up in the water heater tank. As a result, your water heater must work harder to heat up the water. This can produce knocking sounds as well as larger energy bills.
Call Hobson Plumbing and Heating Experts for Excellent Water Heater Replacement
Hot water heater replacement cost isn’t cheap. In fact, installing a new heater can cost several thousand dollars, particularly if you want a tankless model. Learn more about our water heater services and request an in-home consultation to have one of our experts help you choose a replacement unit at no cost.
We take pride in finding the best solution that works for your situation and we guarantee all of our work, no strings attached. Give us a call at 630.761.3400 today. Our Experts are happy to help however we can.
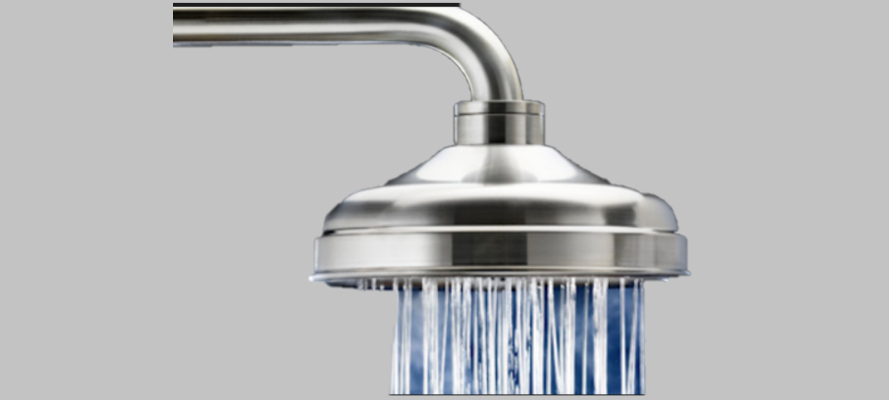
8 Steps to Prevent Running Out of Hot Water
Imagine being in the middle of a nice, hot shower and the water turns cold! Leave the snow and cold outside and take comfort in knowing your hot water heater has your back. Many Chicagoland homeowners rely on hot showers to help ease away that tension from a long day.
If you’re beginning to experience these types of problems often — and your hot water runs out after five to ten minutes — it’s time to stop wondering why and start looking for solutions. If you’re experiencing cold showers after reading these steps, you may want to contact a Hobson Heating and Plumbing technician.
Because water heating is the second largest expense in the American home, accounting for 14–18 percent of our utility bills, it’s worth your while to better understand the reasons your hot water runs out quickly. Then take easy steps to prevent it.
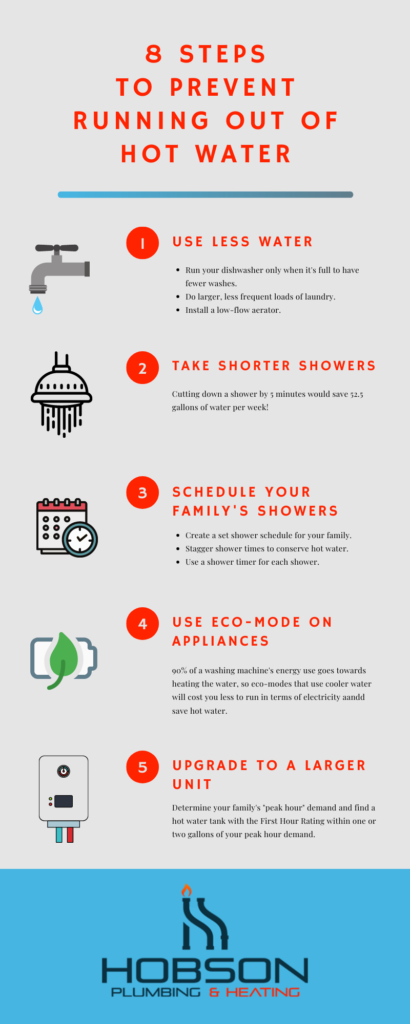
If you ever find yourself in a pickle with little to no hot water and can’t determine the root cause, Hobson Plumbing and Heating is here to serve you. Contact us to schedule an appointment.
5 Reasons Your Home Is Extra Dusty
Who likes a dusty home? If you have ever wondered why your home gets so dusty regardless of how often you clean, this could be a sign that your HVAC system is not filtering dust as it should be. As your trusted Chicagoland plumbing and HVAC service provider, Hobson Plumbing and Heating is always here to help!
Air Filters
Your air filters could be the culprit if you’re experiencing issues with dust. Filters are supposed to trap dust or other materials from entering your home and need to be either replaced or cleaned regularly. If they get too dirty, they will become ineffective and cause dust to build up in your home.
Air Ducts
The problem might also be leaking air ducts. The primary issue with leaky air ducts is that it can cause your HVAC unit to work harder and cause unfiltered, dusty air to get into your home. Signs of a leaky air duct are lint or dust build up on vent registers, high energy bills, and hot or cold spots in your house. If you think the air ducts might be the issue, you should inspect the ductwork for leaky joints and seal as needed. Hobson Plumbing and Heating is highly trained in fixing ductwork so don’t hesitate to contact us.
High Humidity Levels
High levels of humidity in the home can also cause dust to build up. Thankfully, there is an easy solution to this issue. To solve for this, many homeowners have installed a whole-house humidifier or a humidifier for each room with the most use. Humidity can be a common problem in Chicagoland area homes and since fungi, mold, and dust mites prefer high humidity levels, this is an issue homeowners should not ignore.
Check for Cracks Around Windows
Another way dust can get into your home is through cracks in windows. If you believe this may be the issue simply re-caulk your windows. This is a great project to tackle during the winter months if re-caulking, however, be sure to use the appropriate caulk that can withstand cold temperatures if near window seals or colder parts of your home.
Reduce Incoming Dirt
Dust can easily be brought into the home from your family’s shoes which is a common reason why the house is so dusty. A simple fix with this is having everyone refrain from wearing shoes inside the home. Easier said than done we know!
It’s a good idea to run through this list first to see if you can tackle dust issues by yourself. However, if you have followed our tips by changing your filters, sealing your ducts, added a humidifier, and are still finding your home to be dustier than usual, it’s best to have your HVAC system checked out by a professional to determine if a repair is needed.
If you have been experiencing indoor quality air issues or an excessive amount of dust in your home and believe your HVAC system may be the issue, contact us for service.
3 DIY Fixes For Your Hot Water Heater
The thought of going near a hot water heater may seem daunting to some homeowners, but there are 3 repairs that are not so complicated if you’re willing to give it a shot.
As a trusted plumbing company in North Aurora, we get a constant flow of calls from shivering homeowners experiencing a freezing shower. Often the call is due to these 3 simple to fix problems.
Hot water heater temperature
When water heater temperature is too hot or too cold, this is a common problem with hot water heaters. Luckily for the homeowner, it’s an easy problem to fix.
Every water heater has a temperature dial on the front of the tank. Adjust the dial to either increase or decrease the temperature.
Most Chicagoland plumbers recommend setting the temperature of the hot water heater to 120 degrees Fahrenheit which is also a safe temperature with young children in the home.
You must give the water heater time to change the water’s temperature. Test the water to make sure the water has heated up to the temperature you like.
If this doesn’t fix the problem, then you could have a defective hot water heater thermostat on your hands. This is a much bigger problem and recommend you give Hobson Plumbing and Hearing a call.
The pilot light goes out
If you have a gas water heater the pilot light may go out on occasion. There are several reasons why a pilot light might go out.
The pilot light is a tiny flame that exists to light the gas burner inside the hot water tank.
To light the pilot light first make sure the knob is in the OFF position. Wait at least 3 minutes. While waiting, you can remove the access cover to the burner. Use a flashlight to illuminate the burner.
After five minutes, turn the knob to PILOT. This will start the flow of gas to the burner. Depending on your model, there might be an ignition button. When you push the button, you will hear a click and the pilot will light. It might take more than one push to get the job done.
If there is no ignition button you will need to light the pilot using a flame source. Find a long-necked lighter and apply the flame until you see the pilot light burning again.
Once the pilot light is burning, you must press the regulator valve knob down a with a finger and maintain pressure for one minute. This allows the safety sensor to detect a pilot flame. After the one minute has passed, let up on the knob. Check that the pilot light stays lit then turn the knob to the ON position.
Draining The Hot Water Heater
There are several reasons you might need to drain your hot water heater. Many times, sediment builds up because of hard water, causing your water heater to become less efficient or even clog the water lines. Draining the heater’s tank will allow you to flush the sediment out before it becomes a problem.
Before draining your hot water heater, turn off the cold water supply valve (the water pipe that feeds water into the tank). Then turn off the gas or electricity.
For a gas hot water heater, turn the thermostat setting to PILOT. For an electrical heater turn off the breaker.
After turning off the heating source, you might need to wait several hours for the hot water inside the tank to cool. Proceed with caution as the water draining from the tank may be scalding hot. If this becomes too challenging, please contact us so we can schedule a visit to your home and address the issue for you.
Next, attach a hose to the drain valve. This standard outside style hose valve is located at the bottom of the tank, usually next to the thermostat control knob. Place the other end of the hose somewhere the water can drain such as outside or into the shower drain.
Always assume the water coming from the tank is hot as a safety precaution.
Next, open a hot water tap (faucet) nearest to the hot water heater. This will help relieve the air pressure as the water drains. Open the drain valve to let the water drain from the tank.
Once the tank is empty of water and sediment, you can refill the hot water heater tank. Refilling the tank is just reversing the above steps.
Hot water heaters can be dangerous. So if not 100% confident with your DIY skills then it’s a good idea to play it safe and call an expert.
Don’t wait until you’re deep in hot water, get your hot water heater repaired at the first sign of trouble. Contact Hobson Plumbing and Heating at 630.761.3400. for a trusted service provider in the tri-cities area.
Preventing Heating System Failure
When winter snow and cold weather comes to Chicago, you want to make sure your furnace is in top shape or you could be left in the cold. Even if your furnace is in good shape when you start the season, it could fail or have problems once you begin to use it more heavily.
Below are some things you should do to ensure that your furnace or heating system runs smoothly throughout the winter as well as common troubleshooting for heating problems.
Perform Pre-Season Maintenance
The best way to prevent or reduce the chance of total furnace failure is to have a professional like Hobson Plumbing & Heating come out and do a thorough furnace and air duct check. Our skilled team can check your pilot light, if you have a gas furnace, along with your blower motors, and switches. At the same time, we can clean any filters and air ducts.
Make Sure The Switches And Motor Work
Periodically turn on your furnace’s switches after periods of non-use to ensure that your blower motors work properly. Be on the lookout for weird sounds and smells and contact us if you smell something burning, hear rattling, or even clunking. Do not use your furnace if you suspect that something is wrong with the motor.
Check The Filters Regularly
Even if you just had your filters checked during pre-season maintenance, give them a check off and on throughout the winter season. Heavy use, as well as pet hair and dust flowing through the system, can quickly clog the filters. These clogged filters restrict airflow and cause uneven heating.
Clear Your Vents
Check your furnace registers to make sure that you don’t have furniture, rugs, and other items blocking them. If too many registers are blocked or closed in your home it could create pressure problems that could damage your heating system. Constant hot air blowing is also not good for your rugs and furniture.
Learn Your Furnace Codes
Most modern thermostats have an indicator light that flashes a code whenever there is a problem. You count the number of flashes to find out the error code. Usually, this is a two-number code with one number flashing, then a pause, and the second number flashing. When you call for service, this code number, as well as your furnace’s brand name, is helpful information to give to the technician who can then diagnose and repair the unit quickly.
Furnace failure, especially during a cold winter storm, is a serious problem. If you see any signs of furnace trouble, contact Hobson Plumbing & Heating for a thorough inspection. At Hobson Plumbing & Heating, we have skilled technicians who will check your furnace and determine the cause of your furnace failure. We also have a 100% satisfaction guarantee on all of our work. Contact us today if you need assistance.
3 Important Tips For Your HVAC System
Why you need a post-renovation HVAC cleaning
With more time being spent at home these days, many homeowners are opting to take on renovations. Small businesses with facilities are also taking on necessary improvements. Renovations are a fantastic way to improve the comfort, aesthetics, functionality, and resale value of your home or business property. But it’s a complex process and many people experience a sigh of relief after the project is complete. The loud noise and dust everywhere, you know what we’re talking about!
However, the work isn’t complete once you write your contractor the final check or put away the tools. Nearly all renovations bring in residual dust and debris. If hiring contractors, contracting crews don’t always do a great job of cleaning up after themselves. At Hobson Plumbing and Heating, we take pride in ensuring we leave your space just the way we found it.
The problem is, there’s dust and debris in places you can’t see (and won’t be removed by a post-renovation clean up crew). That’s because it’s inside your HVAC system. Its putting your indoor air quality at risk by harboring odors and putting a strain on your heating and air conditioning equipment. Here’s what you can do about it.
3 Important tips for a post-renovation HVAC cleaning
Any renovation puts a huge load on your HVAC system. Renovations throw up a lot of dust and debris in the air, and it ends up going into your ductwork. While that gets dust out of sight, it also drives up your power bill and shortens the life of your HVAC system.
1. Replace or clean HVAC filters
HVAC filters prevent dust and debris from entering your furnace and air conditioning equipment. If you don’t change the filter regularly, grime accumulates on the moving parts, which affects the equipment’s functioning and drives up energy bills. Clogged filters compromise air flow, and they can lead to your coils freezing or your compressor overheating.New HVAC filters ensure optimal indoor air quality. As a general rule of thumb, you should change out your filters every 90 days. If you have pets, asthma, or young children, you may want to change it as frequently as every 6 to 8 weeks.
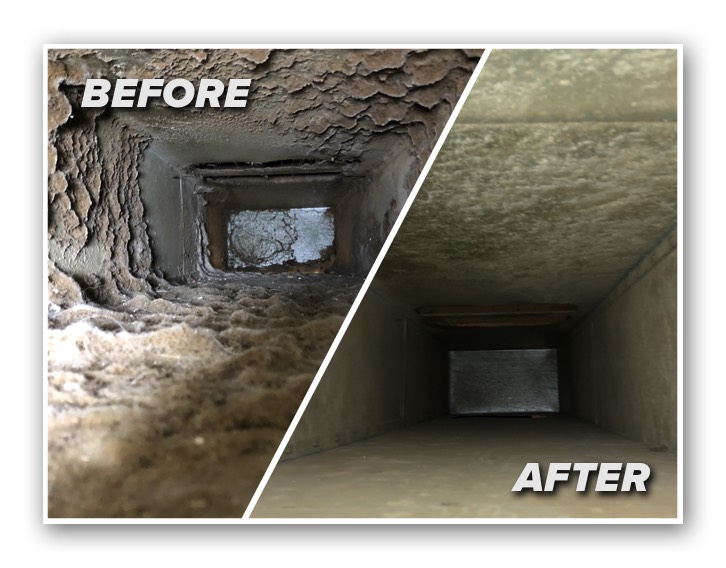
2. HVAC duct cleaning
Duct cleaning refers to cleaning the different heating and cooling system components of forced air systems. Following a renovation, the dust and debris that coats every surface of your space has also accumulated in your HVAC ducts.
Professional duct cleaning gets rid of dust that can clog the passages, but it does more than that. Duct cleaning improves indoor air quality, gets rid of smells from decomposing paint flakes, as well as other volatile chemicals. It also removes moisture that accumulates in the layer of dust, which is a perfect environment for mold growth. When your equipment doesn’t have to work as hard, it uses less energy and is more efficient. That means lower energy bills for you!
3. Air conditioner coil cleaning
Another place where dust and debris can build up after a renovation is on your air conditioner’s coils, which are essential to your cooling system. Over time, the buildup impairs the air conditioner’s ability to remove heat from your space. It can also affect the airflow, which can result in higher utility bills and costly repairs due to equipment failure. Therefore, coil cleaning should be an integral component of all post-renovation cleaning projects.
At Hobson Plumbing and Heating we take care of these tasks. This way you can enjoy your newly renovated space without worrying about odors, breathing construction debris, or unexpected HVAC repair bills due to equipment damage.
When it comes to your HVAC equipment, maintenance matters. Because it’s hidden away out of sight, you can’t see what’s happening to it over time when maintenance is neglected. But you pay the price with higher energy bills, poor comfort conditions, and more frequent breakdowns and repair bills.
Contact Hobson Plumbing and Heating at 630.761.3400 or schedule an appointment for an HVAC cleaning that can help save you from a costly equipment replacement down the road.

3 Ways Dehumidifiers Help With Humidity
Dehumidifiers are a valuable tool in preventing dampness, but they will not resolve the issue entirely. If your home or business is suffering from a dampness problem, the use of a dehumidifier will only help contain the problem as opposed to damp proofing – the more permanent solution.
What is Humidity?
Keeping it simple, humidity is just moisture in the air, typically caused by the evaporation of water. It can be caused by anything from local/global weather patterns to taking a long, steamy shower, to just making several cups of coffee.
There are two main ways to measure humidity – relative and absolute. Absolute refers to the absolute amount of water in a given measure of air, usually in grams per metres cubed. Relative humidity refers to a more complex set of variables linked to everything from air pressure to temperature of the air to the temperature of the environment. What’s important to understand is that the closer the number is to 100%, the closer the air is to what’s called “dewpoint” which is when water will condense.
How are Humidity & Dampness Connected?
It is important to understand that humidity inside a home or building is a symptom of dampness, not the cause. Perhaps your gutters are blocked, weather damage to your roof has let rainwater get in, or something else altogether. These reasons all mean that the air in the space is in contact with more moisture than it should be. This creates humidity and also creating ideal environments for mold spores to settle in and grow.
3 Ways Dehumidifiers Help With Dampness
First, dehumidifiers pull the air into your house. Using their filtration systems, dehumidifiers extract the water expelling clean, dry, air. Dehumidifiers are widely used for all kinds of issues, ranging from allergies to quarantine procedures, as they provide a deeply valuable and functional service to make sure air is dry, clean, and safe.
Secondly, as more spores and moisture collect, condensation and mold sprouting is inevitable. The only way to effectively combat this is to design your spaces with either as little dead air as possible or mark out the spaces where this air might be and move things around regularly.
Thirdly, a whole house dehumidifier creates a better chance of eliminating almost all the moisture in the air and stops new collections of spores sprouting into mold on other surfaces. Unfortunately, it wouldn’t kill the existing mould, as that can only be removed with thorough cleaning. Mold is deeply resilient and needs only the most limited supplies of water to survive.
For more information on the services that we provide, or to request a quotation, please call Hobson Plumbing & Heating today at 630.761.3400 and we will be happy to help.